
Blog Series: Unlocking xDB – Vol: #2
Referenced Sitecore Version: Sitecore 8.1U3 – 8.2
Using List Manager’s CSV Upload to Create xDB Contacts with Custom Fields
Welcome back to Unlocking xDB! In the last blog post, we went through the process of creating a custom facet for contacts stored in xDB. Building upon our example, the Marketing Data facet that we want to maintain with contacts needs to be populated. One way to populate this information is to upload your contact information by using a CSV file. This can be extremely useful if you want to seed xDB with a large number of contacts.
Overview
While this blog post is targeted on Sitecore 8.1U3 and 8.2, it’s worth noting that the following process to accomplish this task was introduced in Sitecore 8.1 Update 2. Prior to Update 2, in order to do this, was a much more convoluted and near impossible.
The process to adjust Sitecore to upload CSV files with custom fields, is relatively simple. In fact, it’s really only 2 or 3 steps. However, some of this is working with Speak Applications. Out of scope of this blog post is providing insight into how List Manager SPEAK UI application works. I recommend following along with Martina Welanders’s 6 Part SPEAK Series for a great introduction to SPEAK.
The process consists of the following steps:
- Prepare the CSV File
- Add Fields to the Import Dialog Wizard
- Add a Pipeline Processor
- Import the CSV File
Step 1: Prepare the CSV File
Following along with our previous example, I’ve setup my CSV file to include my two Marketing Data fields, as well as the default fields used in the importer. Here is what our CSV file looks like:

Walking through the CSV file we have 5 fields:
- First_Name – OOTB Field
- Last_Name – OOTB Field
- Email – OOTB Field
- CustomerId – New Field
- Segment – New Field
A Quick Word About Identifiers in xDB
If you recall from the last blog post, I showed a snippet of a document from xDB. If you recall seeing an email address as the stated identifier, you’d be recalling correctly. In case you forgot, here it is:

The reason I call this out is that an xDB Contact record can only have ONE identifier field. This is basically the only field, besides the Document Guid, that Sitecore uses to identify a contact. Default functionality suggests that the Identifier is an email address as shown above. However, you’ll soon see that you can specify a DIFFERENT field as the Identifier when doing CSV uploads. This provides an opportunity to use an identifier different from an email address. If your scenario needs or requires this configuration, you’ll want to make sure that you include this field into the CSV file. For the purposes of the example of this post, we will be utilizing the email address as our identifier.
Step 2: Add Fields to List Manager’s Import Dialog Wizard
Let’s start with an understanding of how List Manager works out of the box. To start, launch Sitecore and click on List Manager in the dashboard. Once there, click on the big blue Create button in the top left. You’ll see a couple different options. For these example, we’ll be focusing on Import contacts without creating a list but the functionality carries through for creating lists too.
A Brief Interruption To Show How to Use the CSV Uploader

Clicking on the “Import Contacts” option opens up the Import Dialog Wizard. Below is a gallery of the out of the box screens that you’ll see. I’ll walk through these.
- Click on Browse for a file.
- It will open up a file window to select a file.
- Once you select, it provides you an option to set a name. This name is not used inn the “Import Only” option. But if we were creating a list, this would end up being the name of the list.
- Click Upload File
- It’ll upload the file.
- Protip: I’ve run into a wide range of issues with the upload button. If you are having issues, try the following fixes:
- If you are getting a red error box, see Sitecore 8.1 List Manager – CSV Upload Error
- If it’s just not doing anything, and giving you Console issues:
- Check File system permissions for Application Pool User
- Log out of Sitecore, refresh browsers, try again.
- Protip: I’ve run into a wide range of issues with the upload button. If you are having issues, try the following fixes:
- Click Next
- This screen shows the field mapping screen. This is the screen we want to change. Also note the message at the top about the identifier. Clicking this check box will reveal an extra field (See Circle 9 and 10).
- Note here the standard fields that get mapped out of the box.
- Note the Identifier Field as discussed above.
- Okay, let’s uncheck this field.
- Choose the appropriate field from the drop down for each field. The drop down will read from the 1st line of the CSV file for Headers.
- Click Next
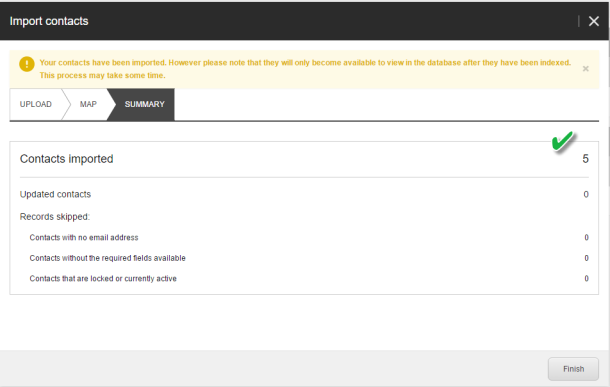
- The message on the last screen at the top is just a reminder that the contacts and any created lists will not immediately show up until indexing finishes.
- Finally, note the number of contacts that were update.
- Note: If a xDB Contact is currently logged in, and you are trying to make an update to their record, the Contact record is considered locked, and the CSV uploader will not update. And no, it won’t even queue.
- Click Finish and you are done.
We Now Return To Normal Programming
So now that I’m confident you know how to use List Manager to upload a CSV file, let’s continue adding custom fields. Here’s the fun part:
- Log Into Sitecore
- Click Desktop
- Switch the Database to Core.
- Yup, we’ll be editing the Core database.
- All items associated to SPEAK UI Applications are always kept in the Core database.
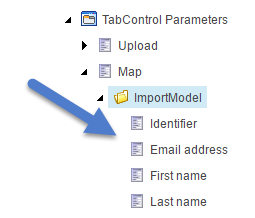
- Navigate to the following Path: /sitecore/client/Applications/List Manager/Dialogs/ImportWizardDialog/PageSettings/TabControl Parameters/Map/ImportModel
- Here you’ll see the following Items:
- These Items are based on the template ImportModelField
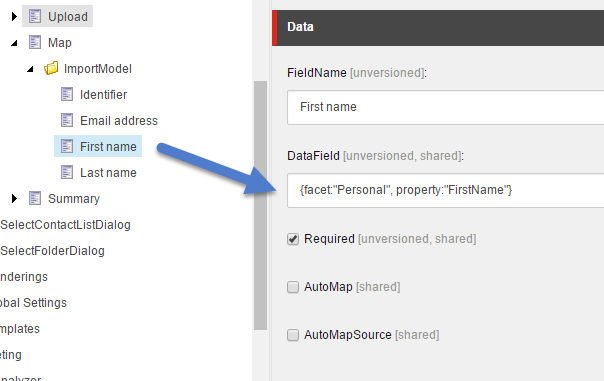
- Looking at one of these fields, we see the following
- Note the syntax of the Datafield.
- facet: Name of the Facet you want to save to.
- property: Attribute Name from Facet/Element Implementation. (Protip: Make sure you use the exact same value as the constant that was created for the attribute in the previous blog)
- Alright, so Duplicate as many times as you need in order to create the additional fields you need. In our example, we’ll do this twice.
- Go ahead and do that, I’ll wait right here.
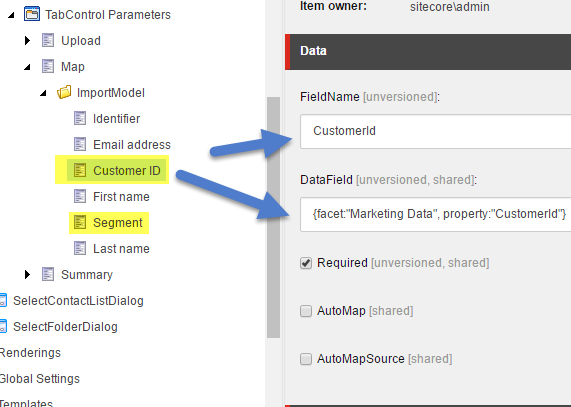
- We’ve now created two additional fields, and you’ll see that the facet has been named Marketing Data which is what we named our facet in the Facet patch config.
- Other Fields On This Item
- FieldName – Set this to the field that’s related in your CSV File.
- This is not a requirement, but helps with Automapping.
- DataField – explained above. Case matters.
- Required – If the field is required or not. If this is marked, and the value is not in the CSV file, the contact will be skipped.
- AutoMap/AutoMapSource – Check these if you want the importer to attempt to automatically map the CSV source field names to the FieldName on the item.
- FieldName – Set this to the field that’s related in your CSV File.
- Okay, let’s stop here. Because Step 2 is done!
Step 3: Add a Pipeline Processor
This is going to be the easiest step ever, because the processor is already created. All you need to do is create a patch config to reference a new processor.
<configuration xmlns:patch="http://www.sitecore.net/xmlconfig/">
	<sitecore>
		<pipelines>
      <group groupName="analytics.bulk.contact">
        <pipelines>
          <updateFields>
            <processor type="Sitecore.ListManagement.Analytics.Data.Bulk.Contact.Pipelines.UpdateFields.DeepCopyFacet`1[[SitecoreHacker.Sandbox.Facets.IMarketingData, SitecoreHacker.Sandbox]], Sitecore.ListManagement.Analytics">
                <param desc="facetName">Marketing Data</param>
              </processor>
          </updateFields>
        </pipelines>
      </group>
		</pipelines>
	</sitecore>
</configuration>
- Change the type to the interface of your IFacet
- Change the description of the facetName.
Step 4: Import the CSV File through List Manager
- Now head back to the CSV Import Wizard in List Manager: (Protip: Make sure you switch back to Master database)

- Notice that the new fields mappings now show.
- Also note the order of the fields. The order of these mappers is directly related to the order of the items in the Core database that we just added.
- Select the appropriate field names out of the drop down box for each of these fields, and press next.
- And if everything goes well, you’ll see that contacts were updated!
- We are done! We have now mapped our custom CSV fields to our Custom xDB Contact Facet.
Validating Our Contacts and Facets
Now that we’ve imported our CSV, let’s take a peek into xDB MongoDB and see if our facet was populated. If everything works right, and you’ve followed these blog posts to the letter, you’ll see what I see:

And that’s it!
Unlocking xDB Continues
In the next installment of Unlocking xDB, we’ll explore the conversion of Sitecore Contacts to xDB Contacts and take a peek at what it will take to carry over custom profile fields into implemented custom facets.

Hi,
Nice article 👍
If i have to show the newly created custom facet value in list manager contact list along with Email, First Name, Last Namethen how we can do it.
LikeLike
It’s doable, but really hard and involves SPEAK. Check out https://jeffdarchuk.com/2017/06/05/no-speak-experience-profile-tab
LikeLike