Over the long MLK 2018 holiday weekend, I had an opportunity to deploy Sitecore 9 (9.0.1 rev. 171219) to Microsoft Azure PaaS. Aside from a short experience deploying Sitecore 8.2.1 using the Azure Marketplace, I had not really done anything with PaaS since, especially with Sitecore 9. In getting my full deployment completed, I ran across a number of things that I felt like weren’t very well explained. The biggest information gap, as I found it, was around Email Experience Manager (EXM) which was introduced as part of the platform with this release. My hope is that by writing this guide, others may find it valuable to help find their way on their journey to Sitecore on Azure PaaS!
Getting Started
Assumptions
Before beginning, it’s important to get some assumptions out of the way. I’m assuming, that by following this guide, you:
- already have a general understanding of how Sitecore works
- already have an Azure Subscription and are capable of logging into Azure
- are working off of a laptop locally to deploy Sitecore to Azure
Additionally, the intention of this guide is not to show you how to configure Sitecore or setup other services like SOLR or Coveo. This guide will help you set up a default installation of Sitecore as provided by the Sitecore release. Future blog posts will cover additional setup options, like setting up SOLR with Sitecore on Azure PaaS as an example.
Helpful Documentation Links
In my journey, I came across a number of documentation links by Sitecore that assisted me. It might be helpful to give these links a read through to set some context so that as you follow this guide, you’ll have less unfamiliar territory to work with.
These links include:
- Sitecore 9.0.1 Download Page
- Sitecore Walkthrough on Deploying Sitecore 9.0.0
- Creating and Deploying Client Certificates
- Sitecore Azure Toolkit v2.0
Laptop Prerequisites
As a developer, having stuff installed on your laptop is important. As I fumbled my way through this deployment, I encountered (at different times) a number of applications that were helpful to have installed. My advice is to install these applications ahead of time. Most should be a one-time installation.
Azure Powershell
Follow the Microsoft directions for installing the Microsoft Azure Powershell
Azure Storage Explorer
I found it incredibly helpful to use the Azure Storage Explorer to upload the WebDeploy Packages (WDP) to my Azure Storage Container Blog. Follow the instructions for installing the Microsoft Azure Storage Explorer.
Create a Working Directory
To help keep me organized, I used an empty folder to work out of, which will eventually store various JSON files, PowerShell scripts, certificates, and toolsets.
For the purposes of this blog post, and any examples you see going forward, my working directory is D:\sitecore9
Sitecore Azure Toolkit
Download the Sitecore Azure Toolkit v2.0 Update 1. This will provide a zip file that can be extracted. My advice is to extract the contents of this zip file to your Working Directory.
By doing this, you should have a D:\sitecore9\tools directory among other things.
About Azure App Service Downloads
The Sitecore Download page for Sitecore 9.0.1 (and other versions) contains a number of links and downloads specific to the selected version of Sitecore. Of these links, you can download files for On-Prem and Local Development setups, and you can download the WebDeploy Packages for Azure App Service Downloads.
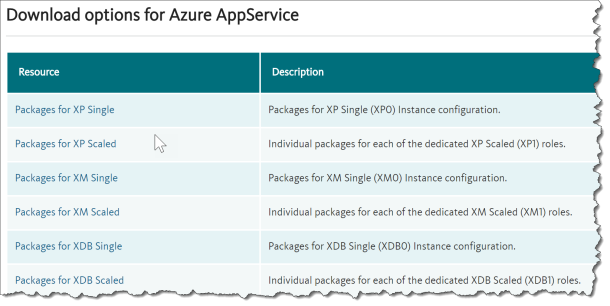
Each of these downloads is for a specific product edition and deployment topology. Each download is also a zip file which contains the WebDeploy Packages (WDP’s). The Product Edition and Scale will determine just how many WebDeploy Packages are included in each zip file.
It’s important to understand which product edition and topology that you’re looking to deploy.
Sitecore Product Edition
The Product Edition determines which features of Sitecore are included with your license. For the most part, your given Sitecore License will denote which edition you can utilize. Knowing which configuration and topology you need to use for your deployment will advise you which zip file to install.
Sitecore xM
Sitecore xM product edition is the Sitecore CMS edition that includes Content Delivery and Content Management role but does not include any xDB or xConnect roles and services.
Sitecore xP
Sitecore xP product edition is the full Sitecore Experience Platform, which includes all Sitecore roles and services, including xConnect.
In addition, new to Sitecore 9.0.1 is the inclusion of the EXM as part of the Sitecore Experience Platform, instead of a separate module. Because of this, the xP version of Sitecore includes the Dedicated Dispatch Server role.
Sitecore xDB
This is a special product edition, which includes just the roles needed to support xConnect. This is made available in instances where there may be a desire to run Sitecore in an On-Prem configuration, but with xDB/xConnect running in Azure PaaS. This includes all of the xConnect roles as well as the Sitecore Processing and Sitecore Reporting roles.
Deployment Topologies
The topologies take the product editions above and determine the number servers and services needed to scale out a specific edition.
Single (xM0, xP0, xDB0)

xP0 Single Topology
The single topology reflects a single server Sitecore implementation. This means that all Sitecore and xDB roles are configured onto a single instance of Sitecore. Additionally, in the xP product edition, all xConnect roles and services are installed into a second, single instance on the same server.
This topology is good for standalone servers and local development needs.
Scaled (xM1, xP1, xDB1)
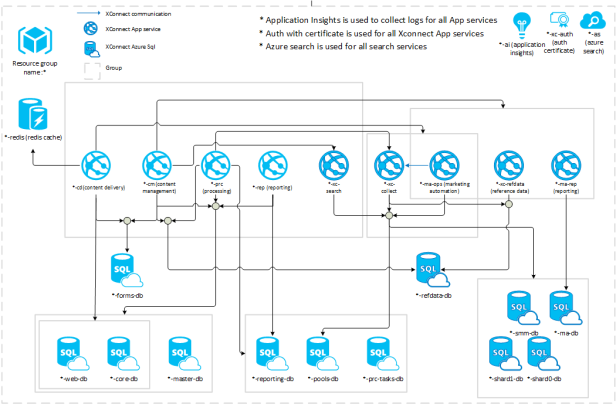
xP1 Scaled Topology
The scaled topology is the exact opposite of the single topology in that every single Sitecore role, xDB role, and xConnect role is separated out into individual roles and services.
Various SXP Role Services
In each of the App Service packages, the following roles can be shown in the scaled out packages. The following list outlines what each role is and their associated abbreviation.
- Sitecore Server Role Services
- Content Management (cm)
- Content Delivery (cd)
- Dedicated Delivery Server (dds) (xP only)
- xDB Role Services (xP and xDB only)
- Processing (prc)
- Reporting (rep)
- xConnect Server Role Services (xP and xDB only)
- xConnect Collection (xc-collect)
- xConnect Reference Data (xc-refdata)
- xConnect Search Service (xc-search)
- Marketing Automation Operations (ma-ops)
- Marketing Automation Reporting (ma-rep)
Prepare for Deployment
By this point, you should have all the things you need to have to set up an Azure PaaS deployment for Sitecore. As a summary, you should have everything listed in the laptop section above as well as chosen a product edition and topology and downloaded the appropriate zip package and unzipped into your working directory.
Upload Packages to Azure Storage Container
Due to the need for Azure to have access to large zip files for Azure PaaS deployment (we call these the WebDeploy Packages or WDP’s), we need to provide Azure a place where it can access these files during the deployment. Having them stored outside of Azure puts the deployment at risk for failure due to disconnection. As such, Azure recommends using an Azure Storage container.
Step 1: Create or Select an Existing Azure Storage Account

Ensure that you select “Blob Storage”
Step 2: Upload the Files using Azure Storage Explorer
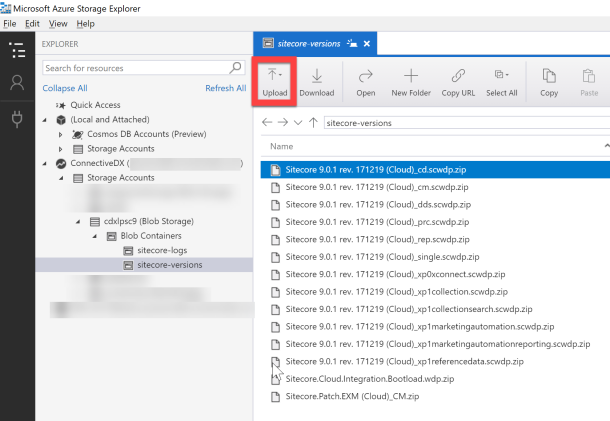
Shows xP1 WDP’s uploaded to a Blob Storage Container
Upload all of the WDP’s zips included in the chosen zip file that you downloaded.
In addition, if you have an intention of using xP1 and enabling EXM Dedicated Dispatch Servers, you must also upload the Sitecore.Cloud.Integration.Bootload.wdp.zip package that is found within the Sitecore Azure Toolkit in D:\sitecore9\resources\9.0.1\Addons.
Step 3: Get Shared Access Signature
In order for Azure (or really anyone) to access these files publically, you must enable a Shared Access Signature. This can be achieved using Azure Storage Explorer.

Do this by selecting the Storage Container that contains your WDP’s and then click on Get Shared Access Signature…
This will open up a window where you can choose the parameters of the Shared Access.

Set a Start Time and End Time. Give yourself enough time to finalize the deployment you’re working on. I gave myself a week. All of the other settings can remain as default.
Once done, press Create and another window will appear that contains the information that you need to record.
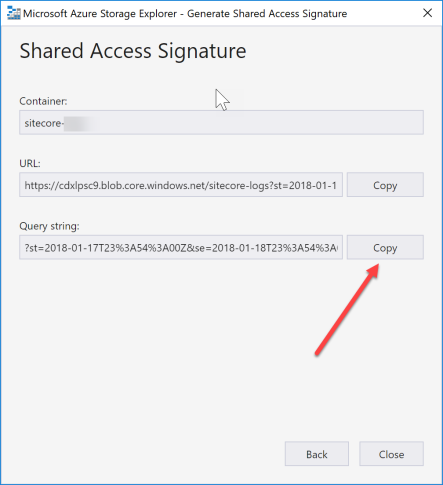
The Query String is what will be needed later. Press the Copy button and paste this query string into a note file that you’ll reference later.
Create Client Certificate
Step 4: Use PowerShell to create self-signed certificate
Following the Sitecore documentation guide for creating certificates, if you need to create a certificate, the bottom of this doc demonstrates how to create a self-signed certificate. You may also utilize a certificate obtained from a Trusted Certificate Authority. Either way, the end result is that you want to end up with a *.pfx file in your working directory. You can directly use the following snippets to create a self-signed certificate.
$thumbprint = (New-SelfSignedCertificate `
-Subject "CN=$env:COMPUTERNAME @ Sitecore, Inc." `
-Type SSLServerAuthentication `
-FriendlyName "$env:USERNAME Certificate").Thumbprint

$certificateFilePath = "D:\sitecore9\$thumbprint.pfx"
Export-PfxCertificate `
-cert cert:\LocalMachine\MY\$thumbprint `
-FilePath "$certificateFilePath" `
-Password (Read-Host -Prompt "Enter password that would protect the certificate" -AsSecureString)
This script can be run directly on a PowerShell command prompt. The script will prompt for a Certificate Password that will be used to secure the certificate.
This password will be used later when creating properties files. Save this password in a note file until needed.
Locating Appropriate Azure ARM Templates
Step 5: Select the ARM Template URL
This is a pretty easy step, but important because the ARM templates are what Azure will utilize to actually build out the resources based on the chosen topology. You can find the link to the GitHub to the Sitecore Azure ARM Templates on the Sitecore Azure Toolkit page. For ease, you can get the link for Sitecore XP 9.0.1 from GitHub directly.

For this example, I’m going to choose XP.

Find the azuredeploy.parameters.json file and click on it.

Click on Raw to get the raw file

Copy the part in yellow highlight and paste into your notepad, as the ARM Template URL No trailing slash.
Step 6: Copy Contents of Parameters File Locally
Now that you have the raw file in your browser, save that file into your working directory as the azuredeploy.parameters.json file. We will be configuring this file in the next section.
Configure Azure Parameters File
Using Notepad++ or some other text editor that nicely formats JSON files, open up the parameters file that you just saved. These parameters are settings that you can adjust for the installation of Sitecore to Azure PaaS. For any given parameters, adjust the value, simply add your parameter string (or bool) to the value field.
Step 7: Typical Sitecore Parameters
- deploymentId
- This ultimately is just the prefix of all resources in a given deployment. For the purposes of the following scripts, we’ll use this as the Resource Group name in Azure. For now, this can be left blank.
- location
- This is the Azure Geographical Location. I’m using East US.
- sitecoreAdminPassword
- Set up the admin password for Sitecore. For Pete’s sake, don’t use b.
- licenseXml
- Leave this blank for now. This ultimately is the location of your license XML file.
- sqlServerLogin and sqlServerPassword
- These are the SQL Server credentials that will be used in the Connection Strings.
- authCertificatePassword
- This is the password attached to the certificate that you created in Step 4.
- authCertificateBlob
- Leave blank. This will eventually be the raw contents of your certificate.
- sitecoreSKU
- The default value is Extra Small. I adjusted mine to Small. It’s like ordering Fries though. Choices can be Small, Medium, Large, Extra Large.
Step 8: Package URL Parameters
There are a series of parameters (depending on your chosen topology) for mapping to the WDP’s that are located in the Azure Storage Container that you uploaded in Step 2. Each MsDeployPackageUrl maps to a role WDP.
For example, the cmMsDeployPackageUrl maps to the *.cm.scwdp.zip file. There are two parts to this parameter. The Uri, and the Query String.
To obtain the full Uri, open up Azure Storage Explorer and navigate to the specific file, right click on it, and choose Properties.

Double click the Uri to select it, and paste it in the Parameter Value.
Next, after you have pasted the Uri for the specific file into the parameters, paste the Query String that you saved from Step 3 which contains the Shared Access Signature. When complete, your value should look something similar to:
"cmMsDeployPackageUrl": {
"value": "https://cdxlpsc9.blob.core.windows.net/sitecore-versions/Sitecore%209.0.1%20rev.%20171219%20(Cloud)_cm.scwdp.zip?st=2018-01-15T12%3A31%3A00Z&se=2018-01-25T12%3A31%3A00Z&sp=rl&sv=2017-04-17&sr=c&sig=nKbm4IJUicWh7rs7OLjXH3vLCraCemnp7%2FaSP7WJ0bs%3D"
},
Step 9: Not-So-Typical Parameters
- allowInvalidClientCertificate
- In the event you’re using a self-signed certificate, you’ll want to add this parameter to your parameter JSON file.
"allowInvalidClientCertificates": {
"value": true
},
Step 10: To Enable EXM Dedicated Delivery Server (optional, xP1 only)
If you’d like to enable the EXM Dedicated Delivery Server (available with xP1 only) then you need to add the following 4 parameters to your parameters file.
"deployExmDds": {
"value": true
},
"bootloaderMsDeployPackageUrl": {
"value": "https://cdxlpsc9.blob.core.windows.net/sitecore-versions/Sitecore.Cloud.Integration.Bootload.wdp.zip?st=2018-01-15T12%3A31%3A00Z&se=2018-01-25T12%3A31%3A00Z&sp=rl&sv=2017-04-17&sr=c&sig=nKbm4IJUicWh7rs7OLjXH3vLCraCemnp7%2FaSP7WJ0bs%3D"
},
"exmDdsMsDeployPackageUrl": {
"value": "https://cdxlpsc9.blob.core.windows.net/sitecore-versions/Sitecore%209.0.1%20rev.%20171219%20(Cloud)_dds.scwdp.zip?st=2018-01-15T12%3A31%3A00Z&se=2018-01-25T12%3A31%3A00Z&sp=rl&sv=2017-04-17&sr=c&sig=nKbm4IJUicWh7rs7OLjXH3vLCraCemnp7%2FaSP7WJ0bs%3D"
},
"exmCmMsDeployPackageUrl": {
"value": "https://cdxlpsc9.blob.core.windows.net/sitecore-versions/Sitecore.Patch.EXM%20(Cloud)_CM.zip?st=2018-01-15T12%3A31%3A00Z&se=2018-01-25T12%3A31%3A00Z&sp=rl&sv=2017-04-17&sr=c&sig=nKbm4IJUicWh7rs7OLjXH3vLCraCemnp7%2FaSP7WJ0bs%3D"
},
Create PowerShell Script to Handle Deployment
Step 11: Create PowerShell script for Deployment
The following script can be utilized directly by copy/pasting and changing the values to suit your need. I named this script DeploySitecore9XPScaled.ps1 but you can call it whatever you like.
$SCSDK="D:\sitecore9\tools"
$SCTemplates="https://raw.githubusercontent.com/Sitecore/Sitecore-Azure-Quickstart-Templates/master/Sitecore%209.0.1/XP"
$DeploymentId = "demo-sitecore901"
$ResourceGroup = "demo-sitecore901"
$LicenseFile = "D:\sitecore9\license.xml"
$CertificateFile = "D:\sitecore9\9E1DC188E6CAFD66E3405FC753DC1B37F30311AF.pfx"
$SubscriptionId = "5bb32fd8-8ae7-4cd6-9e22-694e0fbe7ba9"
$Location="East US"
$ParamFile="D:\sitecore9\azuredeploy.parameters.json"
$Parameters = @{
"deploymentId"=$DeploymentId;
"authCertificateBlob" = [System.Convert]::ToBase64String([System.IO.File]::ReadAllBytes($CertificateFile))
}
Import-Module $SCSDK\Sitecore.Cloud.Cmdlets.psm1
Add-AzureRMAccount
Set-AzureRMContext -SubscriptionId $SubscriptionId
Start-SitecoreAzureDeployment -Name $ResourceGroup -Location $Location -ArmTemplateUrl "$SCTemplates/azuredeploy.json" -ArmParametersPath $ParamFile -LicenseXmlPath $LicenseFile -SetKeyValue $Parameters -Verbose
- $SCSDK – Point this to the tools directory that was added by the Sitecore Azure Toolkit.
- $SCTemplates – Point this to the ARM Template URL you saved in Step 5
- $DeploymentId – Can be anything up to 60 characters. This is used as the prefix of all resources created in Azure.
- $ResourceGroup – The name of the Azure Resource Group to install the services in. If it doesn’t exist, the script will create it.
- $LicenseFile – the location of your license.xml.
- $CertificateFile – the location of your client certificate.
- $Location – Azure Geographical Location.
- $ParamFile – the location of your azuredeploy.parameters.json file.
Leave everything else alone and save the file.
Executing Deployment
Kicking Off Deployment
If you have gotten this far… Good! I haven’t bored you yet!
Step 12: Run your PowerShell script
After all the steps previously are complete, you should have a directory that looks something like this. Time to Run your PowerShell script!

Press Enter and Go!
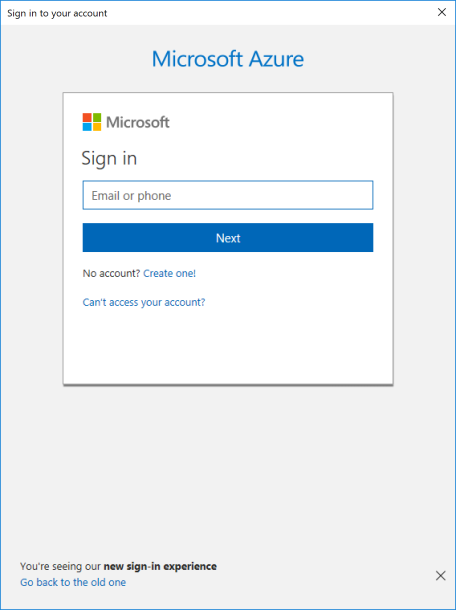
Step 13: Enter Azure Credentials
You will be Prompted like this as soon as you start the script.
ProTip: If you didn’t provide a value for the EXM MsDeploy Packages because you aren’t using the DDS server, you will be prompted for values. you can enter anything. They won’t be used.
Watching Progress
This deployment is a little like watching paint dry. However as long as your PowerShell window kind of looks like below, then you’re off to the races. For a measurement, the xP1 deployment, with EXM DDS, takes about an hour to complete. Go grab a drink or coffee, or use the restroom!

You can also watch progress in the Azure Portal, by clicking on the Resource Group and choosing Deployments.

ProTip: In the event your laptop loses internet connection or for some reason the PowerShell window is closed, as long as the actual deployment didn’t error out, the FULL deployment will still run in Azure without being connected to the laptop.
Post-Deployment Steps
Once the deployment is complete, there are a few steps that you should take.
- Mandatory Steps
- Building Indexes
- Rebuild All Indexes from Control Panel
- Build Link Databases
- Rebuild the Link Databases from Control Panel
- Deploy Marketing Definitions
- From Control Panel, Deploy all Marketing Data
- Building Indexes
- Optional Steps
- Scaling Up Servers
- Based on your needs, you may want to review each role service and determine whether or not you want to increase resources.
- I do this on CD and DDS servers to ensure they can Autoscale.
- I do this on CM and Processing Servers to ensure they have the resources needed.
- Scaling Out Servers
- I also set up rules to scale out the CD and DDS services so that based on rules, they can increase or decrease based on a various selection of metric data. I generally use CPU averages.
- Scaling Up Servers
Summary
In closing, Sitecore has come a long way and really has become a very complex and highly scalable platform. The possibilities are endless with Sitecore on Azure and I look forward to more blog posts from the community (as well as myself) on how we can take this process and evolve it to fit our clients’ needs.
EDIT: I have updated this guide to reflect the importance of running some mandatory post-deployment steps. Not running the Link Database, which was amiss in my original discovery led to analytics not working. For a full review of this, visit my Stack Exchange Question, where I detail out exactly what happens when you accidentally leave off this step on a fresh install of Sitecore 9!

Hello,
DDS role is not available when you use XP Single right? does that mean that we just need to use the latest WDP packages for XP single and EXM will work without any special configuration?
Thanks,
Hanz Enriquez
LikeLiked by 1 person
On xP Single (xP0), EXM works out of the box. This also means dispatch is happening off of the Sitecore instance. If you want a dedicated dispatch server, simply spin up another Sitecore instance and configure the role as a DedicatedDispatch. But yes, EXM is now part of the platform. You will need to configure a SMTP server or add in Sitecore MTA
LikeLike
Hi Pete,
Thks for the great post, I am following your guide to setup a Sitecore XP Scale environment with Solr 6.6.2 (Virtual Machine).
The deployment was failed due to the error ‘The declared parameter Search SOLR Core Application Connection String is not recognized’. Did you see the similar error before?
We checked the template, it’s trying to connect http://ip:8983/solr/xdb but there are not cores were created in Sor.
Thks,
ZP
LikeLike
I feel like theres a typo in your parameters or there is a field missing. I would make sure that you have the most recent Azure Toolkit ARM Templates and that your parameters json is correct.
LikeLiked by 1 person
Have you tried to automate the deployment execution using VSTS (Azure DevOps)?
LikeLike
We have! What we have found though is that, it’s easier to initialize the environment once, which can be done via VSTS. Then for followup depmoyments, using just web deploy packages to each of the web apps needed. For us that has seemed to work the best.
LikeLike